Step 1 – Master Pattern & Tooling Design
The investment casting process begins with creating a precise master pattern. This pattern acts as the blueprint for all subsequent parts and tooling. For stainless steel parts, the choice between aluminum and steel tooling is crucial.
- Aluminum tooling offers faster, cost-effective fabrication and is ideal for shorter production runs.
- Steel tooling is more durable and preferred for long-term, high-volume stainless steel production due to its resistance to wear and heat.
Using CAD software, we design the master pattern with careful attention to detail. One key factor is accounting for stainless steel’s shrinkage during solidification—typically between 1.5% and 2.5% depending on the alloy and geometry. This ensures that the final casting dimensions comply with tight tolerance requirements.
Gating system planning is also a vital part of tooling design. We map out runners, gates, and risers to optimize metal flow, feeding, and solidification specific to each stainless steel grade. Proper gating reduces defects like shrinkage voids and improves surface quality.
By combining smart tooling material choices, precise CAD modeling, and tailored gating design, we set a strong foundation for producing high-quality stainless steel investment castings.
Step 2 – Wax Pattern Injection
Wax pattern injection is a critical step in the stainless steel investment casting process. We use high-precision wax injection machines to create detailed and consistent patterns that exactly match the final stainless steel parts. Controlling the temperature of the wax is essential, especially for thin-wall stainless steel components, to prevent defects like warping or incomplete filling.
Different wax types are selected based on the complexity and size of the part. For thin-walled parts, a low-viscosity wax at carefully regulated temperature ensures excellent flow and surface finish. Common defects during this stage include short shots (incomplete filling), sink marks, and flash. Preventing these starts with optimized mold design, precise temperature control, and regular machine maintenance.
Through these measures, high-quality stainless steel wax patterns form the foundation for the entire investment casting process, ensuring dimensional accuracy and reducing scrap. For a deeper dive into stainless steel casting, check out our detailed guide on what is stainless steel investment casting.
Step 3 – Wax Tree Assembly (Clustering)
In the wax tree assembly stage, individual wax patterns are grouped together by attaching them to a central wax runner system. For stainless steel parts, the design of runners, gates, and risers is critical to ensure smooth metal flow during casting and to prevent defects.
Key design points for stainless steel wax trees:
- Runners and Gates: They must be sized and shaped to handle the higher pouring temperatures and fluidity of stainless steel. Gates are generally wider with gradual transitions to reduce turbulence and minimize surface defects.
- Risers: Proper riser placement is needed to feed metal into the casting as it shrinks, avoiding cavities and porosity. Stainless steels, especially precipitation-hardening grades, need risers positioned where solidification is slowest.
- Tree Configuration: For small-to-medium stainless steel components, common tree layouts include a central main runner with branches extending radially or in tiered layers. This optimizes metal distribution and reduces cycle time.
A well-planned wax tree assembly balances metal flow, shell strength, and cluster size, setting the stage for defect-free castings. This step is crucial in the overall precision investment casting process for stainless parts, ensuring quality and consistency.
Step 4 – Ceramic Shell Building
The ceramic shell is the backbone of the investment casting process for stainless steel parts. We start by dipping the wax assembly into a primary slurry made mostly of zircon, which provides excellent refractory properties suited for 300-series and precipitation-hardening stainless grades like 17-4PH. After the slurry, we apply a stucco layer—fine ceramic particles that harden to form a tough shell.
Typically, we apply 7 to 10 coats, alternating slurry and stucco layers, to build up enough strength to withstand the high temperatures during melting and pouring. This layering is carefully optimized to balance durability with shell permeability, preventing casting defects.
Between each coat, drying time is critical. Allowing each layer to dry properly reduces the risk of cracks or shell failure. Many modern foundries use automated shell-building machines that control dipping speed and drying cycles, improving consistency and throughput.
This precise ceramic shell molding step ensures durable shells that protect the intricate geometry of stainless steel wax patterns and deliver high-quality final castings. For parts requiring further machining, our precision CNC milling services provide excellent finishing options after casting.
Step 5 – Dewaxing (Autoclave)
Dewaxing is a critical step in the investment casting process, especially for stainless steel parts. We use a steam autoclave to melt and remove the wax patterns inside the ceramic shell. Typical autoclave settings are 120–150 psi pressure and 8–12 minutes of dwell time to ensure complete wax removal.
Since stainless steel has a higher thermal expansion than other metals, it’s essential to control the dewaxing conditions precisely. Too rapid steam exposure can lead to shell cracking, damaging the mold. Gradual pressure buildup and consistent temperature help minimize thermal stress on the ceramic shell.
Keeping this balance prevents costly defects and maintains the integrity of the shell for the next steps, ensuring accurate and high-quality stainless steel castings.
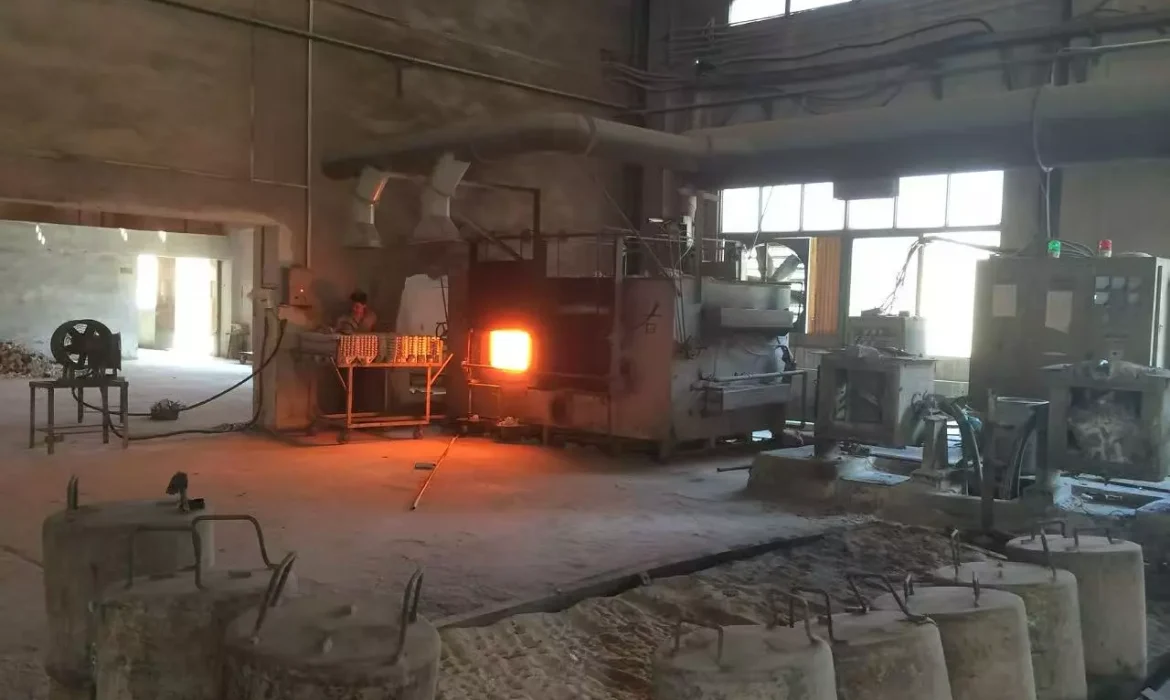
Step 6 – Shell Preheating & Burnout
After dewaxing, the ceramic shells undergo preheating in a furnace at temperatures between 900–1100 °C. This high heat treatment is crucial for the complete removal of any residual wax inside the mold. Leaving wax traces can cause carbon inclusions in stainless steel castings, which weaken the final part.
Proper burnout ensures a clean ceramic mold surface, which helps maintain the casting’s integrity and prevents defects. The controlled temperature ramp-up minimizes thermal shock to the shell, reducing the risk of cracks. This step is especially important for precision investment casting of stainless steel components, where surface finish and internal quality matter most.
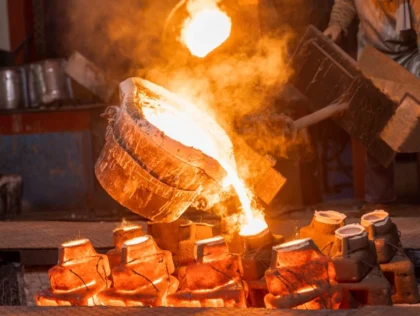
Step 7 – Melting and Pouring Stainless Steel
Melting and pouring are critical steps in the investment casting process for stainless steel parts. The choice between induction melting and vacuum melting depends on the stainless steel grade and the final part requirements. Induction melting is widely used for common grades like 304 and 316, offering good temperature control and efficiency. For high-performance alloys such as 17-4PH or duplex stainless steels, vacuum melting is preferred to reduce contamination and improve alloy cleanliness.
Pouring temperatures vary by grade—for example, 316 stainless steel usually pours between 1550 and 1600 °C to ensure proper fluidity without degrading the metal. Maintaining these temperatures helps avoid defects and promotes better filling of thin sections.
To minimize oxidation and nitrogen pickup, pouring is often done under inert gas atmospheres or in vacuum conditions. This is especially important for stainless steel because unwanted oxygen or nitrogen can form inclusions or weaken the final casting. Controlling the pouring environment maintains the high corrosion resistance and mechanical properties expected in precision investment casting.
For specialized applications like aerospace or medical components, these controlled melting and pouring techniques ensure consistent quality and reliability. This step works hand-in-hand with earlier process stages like ceramic shell building to deliver defect-free stainless steel castings.
(Also consider how gas or vacuum melting process is integral in fluid vacuum components production, as seen in advanced manufacturing solutions for oil and gas – more insights can be found in our detailed guide on fluid vacuum components.)
Step 8 – Shell Knockout & Cut-Off
Once the stainless steel has cooled, the ceramic shell needs to be removed carefully to avoid damaging the casting. There are two common methods for shell knockout: mechanical and water-blast. Mechanical knockout uses vibration or impact to break away the shell, which works well for sturdy shells but can risk surface damage if not controlled. Water-blast knockout, on the other hand, uses high-pressure water jets to cleanly remove the ceramic material, offering a gentler option for delicate or thin-walled stainless steel parts.
After shell removal, the gating system—runners, gates, and risers—must be separated from the casting. Precision sawing or abrasive cutting is used to cleanly cut off gates without warping or surface defects. These finishing steps require careful setup to maintain close tolerances and surface quality.
For high-precision parts, using modern CNC milling machines in finishing operations helps ensure dimensional accuracy and surface integrity. You can learn more about this process in our detailed guide on CNC milling machines, which plays a major role in post-cast processing for stainless steel investment castings.
Step 9 – Finishing Operations
After casting, finishing operations are essential to meet quality and dimensional standards for stainless steel parts. The process starts with grit blasting, which cleans the surface by removing residual ceramic shell material and improves the surface texture for further treatment. For parts with complex internal passages made by ceramic cores, leaching is used to carefully dissolve and remove the core material without damaging the casting.
Next, we perform straightening to correct any minor warping or distortion that may have occurred during casting or cooling. This ensures the parts meet the required dimensional tolerances. For any surface or structural defects, limited welding repairs can be carried out following ASTM A957 guidelines, which specify acceptable repair practices to maintain the integrity of stainless steel castings.
These finishing steps help deliver precision stainless steel components ready for final inspection and use. For detailed machining after finishing, consider complementing the process with specialized CNC milling services for complex components to achieve tighter tolerances or intricate geometries.
Step 10 – Heat Treatment & Final Quality Control
After casting, heat treatment is crucial for stainless steel parts to reach their full mechanical properties. Solution annealing is commonly used for austenitic grades like 304 and 316. This involves heating the parts to 1900–2050 °F to dissolve carbides and relieve stresses. For precipitation-hardening stainless steels such as 17-4PH, well-defined schedules like H900 and H1150 apply, where parts are heated at specific temperatures to develop strength and hardness.
Once heat treatment is complete, thorough final quality control ensures the castings meet industry standards. This includes:
- Non-destructive testing (NDT) such as X-ray inspection, dye penetrant, and ultrasonic testing to detect any internal defects like cracks, inclusions, or porosity without damaging the part.
- Dimensional inspection to verify that tolerances are within the ±0.005 in/in range, maintaining precision for critical applications.
- Pressure testing is often performed for parts used in fluid or gas systems to ensure leak-free performance under operating conditions.
These final steps guarantee stainless steel investment casting parts are reliable, durable, and ready for demanding U.S. market applications in aerospace, medical, and industrial sectors. For more on components requiring precise pressure regulation, you can also check out detailed guides on pressure regulators.
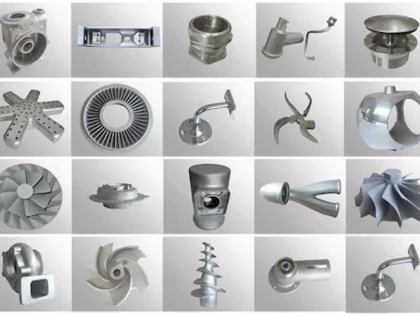
Stainless Steel Grades Most Commonly Used in Investment Casting

When it comes to stainless steel investment casting, certain grades stand out for their performance, corrosion resistance, and machinability. The most common grades you’ll encounter include:
- 304 / 304L: Versatile and cost-effective, these austenitic stainless steels are great for general-use parts requiring good corrosion resistance and weldability.
- 316 / 316L: Known for superior corrosion resistance, especially in marine or chemical environments. The low-carbon 316L variant helps prevent carbide precipitation during welding.
- 17-4PH: A precipitation-hardening grade popular for aerospace and medical components, offering high strength and good corrosion resistance after heat treatment.
- 15-5PH: Similar to 17-4PH but with better corrosion resistance, often used in aerospace and nuclear applications.
- Duplex 2205: Combines austenitic and ferritic properties, delivering excellent strength and resistance to stress corrosion cracking.
- CA6NM: A martensitic stainless steel preferred for valve components and pump parts due to its high toughness and wear resistance.
Each of these stainless steels suits different applications, whether it’s precise investment casting for aerospace, medical devices, or industrial machinery. Choosing the right grade depends on your part’s operating environment and mechanical requirements.
For more on selecting materials and prototyping, check out how to create a prototype efficiently and effectively.
Tolerances, Surface Finish & Design Guidelines
When it comes to stainless steel investment casting, maintaining tight tolerances and proper design is key for reliable parts. Typical linear tolerances are around ±0.005 inches per inch, which ensures good dimensional accuracy straight out of the casting.
The as-cast surface finish usually falls between 90 and 125 RMS, providing a smooth enough base that often requires minimal secondary machining depending on the application. For critical surfaces, further finishing like grit blasting or polishing is common.
Design-wise, here are some quick guidelines to keep your stainless steel investment castings on point:
- Minimum wall thickness: Generally, aim for at least 0.04 to 0.08 inches to maintain strength and avoid defects like warping or incomplete filling.
- Draft angles: A minimum of 1 to 3 degrees draft helps with pattern removal and reduces shell damage during casting.
- Uniform wall thickness: Avoid abrupt thickness changes to reduce shrinkage and stress-related defects.
- Rounded corners and fillets: These improve material flow and reduce hot spots that can cause cracks.
Following these standards helps ensure your parts meet quality and functionality needs. For complex parts that may require close monitoring of dimensions, investing in proven precision CNC machining services can help hit critical tolerances more efficiently, saving time and cost downstream.
Adhering to these surface finish and design best practices supports a smooth, defect-free stainless steel casting process tailored for demanding sectors like aerospace, medical, and industrial applications.
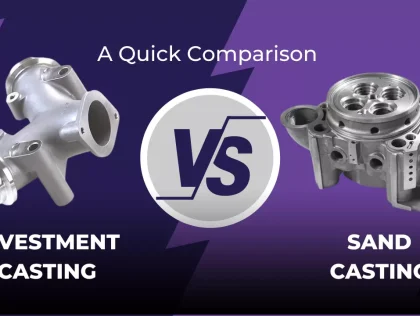
Advantages vs. Sand Casting and CNC Machining for Stainless Parts
Investment casting stainless steel parts offer several clear advantages compared to sand casting and CNC machining, especially when precision and surface finish are critical.
Compared to sand casting:
- Better surface finish: Investment casting achieves smoother surfaces (90–125 RMS) right out of the mold, reducing or eliminating the need for extensive finishing.
- Finer detail and thin walls: The wax pattern and ceramic shell allow for very thin sections and complex geometries that sand casting struggles with.
- Lower porosity and fewer defects: The controlled ceramic shell process and vacuum or inert gas pouring minimize gas porosity and inclusions common in sand casting.
Compared to CNC machining:
- Cost-effective for complex shapes: Investment casting handles complicated internal and external shapes cost-effectively without the waste material typical of machining.
- Shorter lead times for high volumes: Once patterns are made, casting multiple parts is faster and less expensive per piece than machining each part.
- Lightweight designs: Thin-wall casting reduces weight without sacrificing strength, which is hard to achieve economically with machining.
For custom stainless steel parts, combining investment casting with secondary CNC machining is often the best approach. Using precision CNC machining to finish critical surfaces after casting ensures tight tolerances and optimum performance. For more insight on machining stainless parts, consider our detailed custom CNC machining parts manufacturing guide.
Overall, investment casting stainless steel parts provides an excellent balance of precision, design freedom, and cost-effectiveness, especially for industries like aerospace, medical devices, and petrochemical equipment where part quality matters.
Common Defects in Stainless Steel Investment Casting & How We Prevent Them
Stainless steel investment casting is precise, but defects can still happen. The most common issues include:
- Gas Porosity: Tiny gas bubbles trapped inside the casting. This usually comes from moisture in the wax or ceramic shell or from inadequate melting processes. We prevent this by thoroughly drying shells, using vacuum or inert gas melting, and controlling mold temperature.
- Shrinkage: Occurs when the metal contracts as it cools, leading to voids or dimensional inaccuracies. We handle shrinkage by proper gating system design, using accurate shrinkage allowances (typically 1.5–2.5%), and ensuring slow, uniform cooling.
- Inclusions: Unwanted non-metallic particles stuck in the casting, which weaken the stainless steel. Inclusions often come from contaminated melting charges or ceramic shell debris. We maintain clean melting environments and use high-purity raw materials to avoid this.
- Hot Tears: Cracks formed during solidification due to metal stress. Stainless steel’s thermal expansion can worsen this, so we design ceramic shells with flexibility and use controlled pour rates to reduce stress.
By understanding these root causes and applying precise controls—from wax pattern quality to heat treatment—we ensure stainless steel castings meet tight tolerances and performance standards without common defects.
For more on precision manufacturing steps, see how we utilize advanced ceramic shell building and gating system design in our spiral groove bearing solutions for medical and aerospace equipment.