Introduction: Let’s be honest: CNC quotes can feel like a black box. You send the same STEP file to three shops and get three wildly different prices. The gap isn’t just about labor rates; it’s about how a shop calculates tool wear, setup amortization, and digital overhead. If you’re wondering why your last batch was so expensive, or how to trim the fat off your next RFQ, you need to look at the mechanics behind the invoice. This guide breaks down the real-world variables that drive CNC costs from the perspective of the machine shop floor.
Quick Reference: Design Decisions vs. Cost Impact
| Feature / Choice | High-Cost Option | Low-Cost Alternative | Impact on Price |
|---|---|---|---|
| Material | Titanium / Inconel | Aluminum 6061 / Steel | 3x – 5x Higher |
| Quantity | 1-5 Units | 100+ Units | 60%-90% Lower per part |
| Tolerances | Tight (±0.01mm) | Standard (±0.125mm) | 2x – 3x Higher |
| Pocket Depth | Deep (>4x Diameter) | Shallow (<3x Diameter) | 20% – 40% Higher |
| Wall Thickness | Thin (<0.5mm) | Robust (>0.8mm) | High Cycle Time |
The “Big 4” Core Factors of CNC Machining Costs4
Material Selection & The Machinability Index
In the shop, we don’t just look at the price per pound of metal; we look at the Machinability Index. Aluminum 6061 is the industry workhorse for a reason—it’s easy on the tools and lets us run the machine at maximum speed. But when you move to Titanium Grade 5 or Inconel, the math changes. These “tough” materials generate intense heat at the tool tip, forcing us to slow down feed rates by 60% or more. You aren’t just paying for the titanium; you’re paying for the fact that the machine has to run three times longer to cut the same shape, and we’ll likely burn through several expensive carbide end mills in the process.
Another factor that eats your budget is the Buy-to-Fly ratio. If your design requires starting with a 20lb block of stainless steel only to mill it down to a 1lb bracket, you’re paying for 19lbs of “chips.” With rising raw material costs, that waste is expensive. We always tell customers: check your stock sizes. If you can design your part to fit within a standard plate thickness or bar diameter, you save the shop the time of squaring up the stock and save yourself a massive chunk of the material bill.
Machine Hourly Rates: 3-Axis vs. 5-Axis vs. Mill-Turn
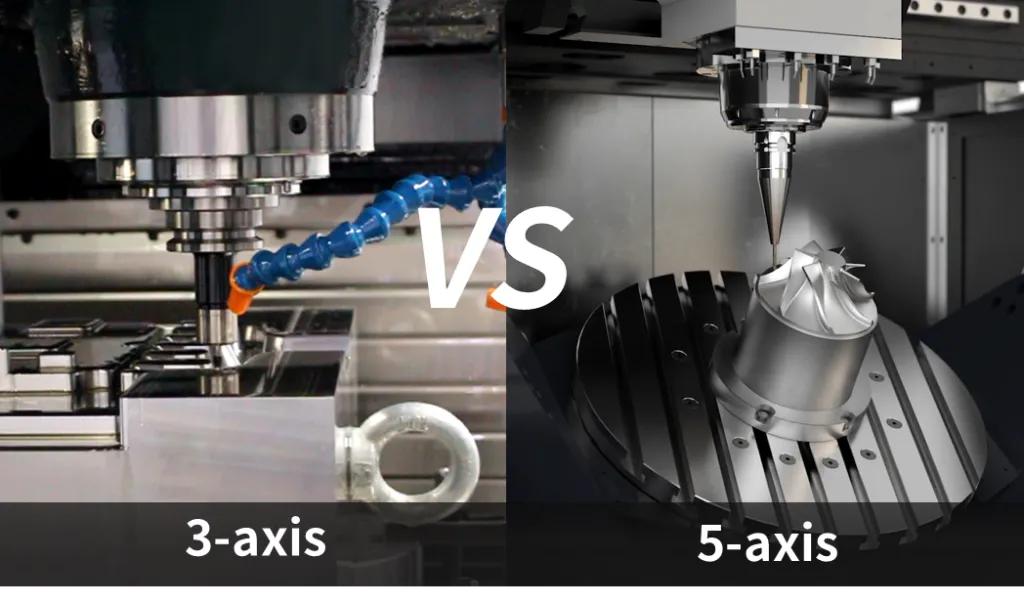
Hourly rates generally fall into three tiers. A basic 3-axis mill might run $45–$75/hr. It’s cost-effective for simple work, but it lacks intelligence—if your part has features on five sides, a technician must manually stop the machine, flip the part, and re-zero the coordinates five times. Each “flip” is a setup charge and an opportunity for alignment error.
This is where 5-axis machines or Mill-Turn centers (costing $125–$200/hr) often become the cheaper option for complex work. They achieve “One-Done” machining, reaching almost every angle in a single setup. Even though the hourly rate is higher, if it eliminates four manual setups and cuts total labor time in half, your per-part price drops. When reviewing a quote, don’t just look at the rate—look at the total hours. A sophisticated 5-axis shop can often out-price a 3-axis shop on complex parts because they aren’t paying a technician to baby the machine through multiple setups.
Programming & Setup: The “Fixed Cost” Barrier
Before a single chip is cut, there’s a massive amount of “hidden” work known as Non-Recurring Engineering (NRE). A programmer must sit down with your file, pick the tools, define the paths, and run a simulation to ensure the spindle doesn’t crash into a fixture. This “office time” usually costs between $65 and $150/hr. If you only order two parts, that 4-hour programming job adds $200–$300 to each part.
This is why “one-offs” carry such a premium. The best way to beat this is batching. If you order 50 units instead of 5, that same programming and setup time gets spread across the whole batch. In the shop, we love repeat orders because the programming is already done. If you have a recurring project, ask for a “re-order” discount. Also, keep your CAD files clean; if our engineers have to spend two hours fixing “leaky” surfaces or overlapping lines in your STEP file, that labor will show up on your invoice.
Geometry Complexity & Cycle Time
Complexity boils down to one thing: Cycle Time. Every pocket, every chamfer, and every engraved logo adds seconds to the clock. The real killers are deep, narrow pockets. If you design a pocket that’s 50mm deep with a 3mm corner radius, we can’t just “hog out” the material. We have to use a long, skinny tool that is prone to vibration (chatter). We’re forced to take tiny “whisker” cuts, which turns a 10-minute job into a 60-minute job.
Modern shops use high-speed toolpaths to clear material faster, but we can’t beat physics. Thin walls (anything under 0.8mm) are another headache. They flex when the tool hits them, meaning we have to go slow and take multiple passes to hit the tolerance. To keep costs down, follow the L/D (Length-to-Diameter) rule: try not to make pockets deeper than 3 times the tool diameter. Every time you push a feature to the “extreme,” you’re essentially paying the shop to slow down.
Hidden Cost Drivers Most Buyers Overlook
The “Tolerance Trap”: Why ±0.001 is 2x More Expensive Than ±0.005
In the shop, we call this the “Tolerance Trap.” If you mark a dimension as ±0.01mm (±0.0004”), you’ve just moved that part from a standard mill to a specialized grinding or honing operation. It means we have to slow down, use brand-new tools for every part, and spend significant time with a CMM (Coordinate Measuring Machine) in a temperature-controlled room to verify the numbers.
The scrap rate also spikes. If the shop temperature changes by 5 degrees, an aluminum part will expand or contract right out of your tight tolerance. You end up paying for the 20% of parts we’ll likely have to throw away. Pro-tip: Only tighten tolerances where you actually need a press-fit or a bearing seat. For non-mating dimensions, keep them loose to save your budget.
Internal Radii & Deep Pockets: Tooling Constraints and Breakage Risks
Sharp internal corners are a machinist’s nightmare. Since CNC tools are round, we can’t cut a sharp 90-degree corner. If your design demands it, we have to use EDM (Electrical Discharge Machining), which “burns” the metal away with a wire. It’s slow and incredibly expensive.
Even if you allow a radius, making it too small is a problem. If you specify a 3mm radius, we have to use a 6mm tool. That tool will “dig in” at the corner, causing vibration and a poor finish. The smart move is to make your corner radius slightly larger than a standard tool size (e.g., a 3.2mm radius for a 6mm tool). This lets the tool “glide” through the corner without slamming into a wall of material, resulting in a faster, cleaner, and cheaper cut.
Post-Processing & Surface Integrity
A “standard machined” finish is the most economical. The second you ask for bead blasting, anodizing, or powder coating, the part has to be cleaned, racked, and often sent to a different vendor. That adds shipping costs, lead time, and another opportunity for the part to be scratched or damaged.
Many engineers ask for Ra 0.4 (mirror finish) on parts that don’t need it. To achieve that, we have to use specialized “wiper” inserts and run the machine at a crawl. Unless it’s a seal surface or a medical implant, Ra 1.6 or Ra 3.2 is usually sufficient. Be clear about what you need versus what looks good in a CAD render to avoid unnecessary processing fees.
Quality Assurance & Certification Fees (ISO, AS9100, MedTech)
If you need a First Article Inspection (FAI) or full material traceability (CoC), the paperwork can sometimes cost as much as the machining. For aerospace or medical jobs, every part needs a “birth certificate.” We have to log the heat number of the metal, the calibration dates of every micrometer used, and archive those records for years.
This administrative overhead is real labor. If you’re just making a prototype or a simple jig, don’t ask for AS9100 paperwork unless you actually need it. It’ll save you the “certification fee” and get your parts on the shipping truck significantly faster.
New Trends Impacting Your Quotes
AI-Driven Toolpath Optimization
The best shops today aren’t just “cutting metal”—they’re running simulations. We use AI-integrated CAM software to find the absolute fastest way to clear material without breaking the tool. Ask your supplier if they use Dynamic Milling or High-Efficiency Milling (HEM). These paths keep the tool engaged at a constant load, which lets us cut faster and deeper, directly lowering your per-part price.
The Sustainability Tax: Carbon Footprint Reporting & ESG Requirements
This is a growing “hidden fee.” Large corporations now demand reports on the carbon footprint of their components. If we’re running an old, power-hungry machine and throwing away half the material as scrap, your part’s “carbon score” will be poor, potentially leading to taxes or penalties. We invest in energy-efficient machines and better recycling systems to keep these costs down. While it may make the hourly rate look slightly higher, it saves you from massive ESG penalties and regulatory hurdles down the line.
Strategic Optimization: How to Slash Your CNC Bill by 30%
- The 0.8mm Rule: Keep your walls at least 0.8mm thick. Anything thinner vibrates and warps, requiring slow, expensive passes.
- Standardize Tooling: Don’t use ten different screw sizes if two will do. Fewer tool changes equals a lower price.
- Blanket Orders: If you know you need 1,000 parts over the next year, don’t buy them 100 at a time. A Blanket Order allows us to buy all material at once (locking in the price) and run the parts during off-peak hours.
- Negotiate the “NRE”: For long-term projects, ask if the shop will waive the programming fee in exchange for a 12-month contract.
Conclusion: Getting an Accurate Quote Fast
The fastest way to get a “High Quote” is to send a messy RFQ. A perfect RFQ package includes three things: a clean STEP file, a 2D PDF for the critical tolerances, and a clear quantity. If you tell us “I might need 10 or I might need 1,000,” our quote will be conservative (high) to cover the risk. Be honest about your volumes and your deadlines, and you’ll find that most shops are happy to help you optimize your design to hit your budget.
Ready to optimize your design?
Would you like me to generate a Technical RFQ Checklist or a Material Substitution Guide for your team?